Tuesday, August 16, 2011

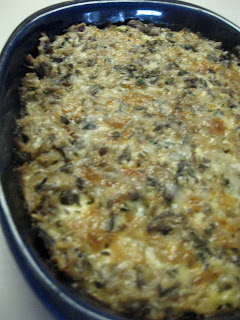
Earthy Every Day Casserole


Here’s a recipe for my brother in law from one of the cookbooks they gave me for my birthday, Super Natural Every Day by Heidi Swanson. Mushroom, cheese, and thyme make this an earthy comfort delight. I also used light versions of the cottage cheese and sour cream to make it edible every day. 

Wild Rice Casserole
2 large eggs
1 cup cottage cheese
½ cup sour cream
1 Tsp. Dijon mustard
Sea salt
1 Tbsp. extra-virgin olive oil
8 ounces cremini mushrooms, chopped
1 large yellow onion, finely chopped
3 garlic cloves, finely chopped
3 cups cooked wild rice
½ cup grated Gruyere cheese
1 tsp. chopped fresh thyme

Directions: Preheat the oven to 350 degrees with a rack in the top third of the oven. Rub a medium-large baking dish with a bit of olive oil. A 9 by 13-inch dish should work, or two smaller baking dishes. Whisk together the eggs, cottage cheese, sour cream, mustard and ½ tsp. salt. In a large skillet over high heat, combine the olive oil with a couple pinches of salt. Stir in the mushrooms. After the initial stirring, leave the mushrooms alone until they release their water and the water evaporates, about five minutes. Continue to cook and stir every couple minutes until the mushrooms are browned. Add the onion and cook until the onion is translucent, about two to three minutes. Stir in the garlic, cook for another minute, and remove from the heat. Add the rice to the skillet and stir until combined. Add the rice mixture to the cottage cheese mixture, stir until well combined, and turn into the prepared baking dish(es). Sprinkle with two-thirds of the grated cheese and cover with aluminum foil. Bake for 30 minutes. Remove the foil and bake for another 20 to 30 minutes, until the casserole takes on a lot of color. Serve sprinkled with the chopped thyme and the remaining grated cheese.
 Yummers.

Tuesday, July 26, 2011

French Toast for the Lovers


Here is an old photo, and recipe, reposted per special request. While this recipe (from Cook’s Illustrated January/February 2009) includes ingredients I rarely have on hand (e.g., white bread, whole milk), they are worth scrounging up for a special occasion. The special occasion…the best French toast you’ll ever eat, or at least make yourself. Whether making it as a special treat for yourself, or someone else (which I highly recommend), don’t skimp on any of the steps or ingredients. Indulgent and sweet, this dish is worth sharing on a weekend morning (or afternoon).

Ingredients: 
8 large slices hearty challah bread
11/2 cups whole milk, warmed
3 large egg yolks
3 Tbsp light brown sugar
1/2 tsp ground cinnamon
2 Tbsp unsalted butter, melted, plus 2 Tbsp for cooking
1/4 tsp table salt
1 Tbsp vanilla extract
Maple Syrup

Directions:
1. Adjust oven rack to middle position and heat oven to 300 degrees. Place bread on wire rack set in rimmed baking sheet. Bake bread until almost dry throughout (center should remain slightly moist), about 16 minutes, flipping slices halfway through cooking. Remove bread from rack and let cool 5 minutes. Return baking sheet with wire rack to oven and reduce temperature to 200 degrees.
2. Whisk milk, yolks, sugar, cinnamon, 2 Tbsp melted butter, salt, and vanilla in large bowl. Transfer mixture to a shallow baking pan.
3. Soak bread in milk mixture until saturated but not falling part, about 20 seconds a side. Using a slotted spatula, pick up bread slice, allowing excess milk mixture to drip off. Repeat with all slices. Place soaked bread on another baking sheet or platter.
4. Heat ½ Tbsp butter in 12-inch skillet over medium-low heat. When foaming subsides, use slotted spatula to transfer 2 slices of soaked bread to skillet and cook until golden brown, 2 to 4 minutes. Flip and continue to cook until second side is golden brown, 3 to 4 minutes longer. Transfer to baking sheet in oven. Wipe out skillet with paper town and continue cooking remaining bread 2 pieces at a time, adding ½ Tbsp of butter for each batch. Serve warm, passing maple syrup separately. 


Sunday, July 24, 2011

Summer Harvest Menu

One of my favorite weekend activities involves planning and preparing healthy delicious meals for the week. First, I will attend one of the local farmer's market and purchase the brightest and most beautiful produce. Then, I spend Saturday mornings leisurely drinking coffee and combing through cookbooks looking for recipes that highlight the chosen ingredients. After that, I'm off to the grocery store to purchase additional ingredients. 


This weekend started with my mother telling me about a cucumber tomatillo mint beverage she had made recently. After hearing about her recipe and researching agua fresca recipes, I settled on the following beverage.  It was maybe a little adventuresome for the party I took it to, so before making it, make sure the idea of drinking cucumber juice sounds good to you. 


Watermelon Cucumber Lime Mint Agua Fresca
1 lb of cucumbers coarsely chopped
1/2 cup fresh lime juice
1 1/4 cup packed (spearmint) mint leaves
1/2 cup sugar (optional)
1/2 seedless watermelon
Approximately 1 and 1/4 cup of water

Directions: Put ingredients in blender, add enough water to fill 3/4 of blender (may have to do in two batches). Hold the lid on the blender and purée until smooth. Place a fine mesh sieve over a bowl and pour the purée through it, pressing against the sieve with a rubber spatula or the back of a spoon to extract as much liquid out as possible. Fill a large pitcher halfway with ice cubes. Add the juice. Serve with sprigs of mint and slices of lime.
I also recently had a very delicious jalapeno lemonade, so some sliced up jalapenos might be a nice addition to an agua fresca as well. 

Next, I had to find some recipes to use up fresh basil, zucchinis, and more cucumber. I made the following fresh basil vinaigrette to put on salads or steamed fish and vegetables throughout the week. I also recently received enough cans of Thai curry paste to supply me with curry for the next 15 years, thanks to a friend's miscalculation, so I have been on a curry kick as well. The following are the recipes that I settled on. I HIGHLY recommend this veggie burger recipe. Muy delicioso, and I am not usually one to love my own food. 

Fresh Basil Vinaigrette
3/4 cup olive oil
2 cups chopped fresh basil leaves
1 shallot, peeled
1 garlic clove, peeled
1/4 cup red wine vinegar
1/4 cup water
1/2 teaspoon table salt
1/4 teaspoon ground back pepper
2 teaspoons Dijon mustard

Directions: Heat 1/4 cup oil with 1 cup basil in medium saucepan over medium heat until basil turns bright green. Turn off heat and steep for 5 minutes. Process shallot, garlic, vinegar, water, salt, pepper and mustard in food processor (or blender) until garlic and shallot are finely chopped. With blender still running add remaining olive oil and steeped basil oil until emulsified. Pack remaining 1 cup basil into food processor or blender and process until smooth. Note: I only had about 1 cup of basil. You could also sneak in some spinach here too.


Sweet Potato Meatless Burgers
1 large sweet potato, peeled and grated
1 large zucchini, grated
2 large carrots, peeled and grated
1 sleeve low-salt, whole-wheat saltine crackers, crushed into crumbs
1 cup cooked brown rice
3 egg whites
juice of 1 fresh lemon
1/2 cup ground almonds
1/2 cup ground sunflower seeds
1 tsp unrefined sea salt
pinch of freshly ground back pepper
1 tsp dried oregano
1 tsp dried basil

Directions: Preheat oven to 375 degrees, line a baking sheet with parchment paper. Combine all ingredients in a very large mixing bowl. With clean hands mix everything together. Using your hands, shape them into balls and press them into a burger shape on a cookie sheet. Bake for 15 minutes, flip and bake for 5 more minutes. Patties should be golden brown on top.

Cucumber Salad
1 English cucumber, unpeeled and thinly sliced
1/2 cup ice cubes
1/4 cup white vinegar
1/2 tsp sea salt

Directions: Mix vinegar and salt in mixing bowl. Coat cucumbers. Place ice cubes on top until time to serve or keep refrigerated. 


Summer Squash Soup
8 ounces extra firm tofu, cut into cubes
Fine-grain sea salt
1 Tbsp red Thai curry paste, plus more if desired
3 Tbsp extra-virgin coconut oil
3 large shallots
11/2 pounds yellow summer squash or zucchini
12 ounces potatoes, unpeeled and cut into cubes
4 cloves garlic, chopped
2 cups lightly favored vegetable broth or water
1 can coconut milk

Directions: Place tofu between two layers of a kitchen cloth until some of the moisture is removed. Season with a pinch of salt, and toss with oil, and cook in a large skillet over medium high heat for 5 minutes until the pieces are browned on one side. Toss gently and cook until tofu is firm and browned and then set aside (I have yet to figure out how to do this without the tofu crumbling). Mash the curry paste into the coconut oil and heat in a large saucepan over medium high heat until fragrant. Stir in the shallots and a few pinches of sat until the shallots are tender. Stir in the squash and potatoes and cook until tender (a few minutes). Stir in the garlic, coconut milk, and vegetable broth. Bring to a boil, reduce heat, and simmer for 15 minutes until the potato is tender. Taste and adjust the seasoning. Serve each bowl topped with some of the tofu croutons.


Friday, July 1, 2011

Mexican Dinner Teaser

I have future plans of cooking a Mexican dinner with my friend Gina who made me aware of the Better Homes and Garden Special Edition Publication entitled Ultimate Mexican. Besides beautiful pictures, it also appears to contain authentic recipes. A future goal will be to practice the art of tamale making, but in the mean time, here is a recipe for some darn good guacamole.


Chunky Guacamole
1 seeded and chopped jalepeno pepper
1/4 cup chopped fresh cilantro
1/3 cup chopped roma tomato
1/4 cup sliced green onion
2 Tablespoons lime juice
1 Tablespoon olive oil
1 to 2 garlic cloves minced
1/4 teaspoon salt
1/2 teaspoon fresh ground black pepper
2 very ripe avocados, halved, seeded, peeled, and cubed


In a bowl combine tomato, onion, lime juice, oil, garlic, salt, and black pepper. Gently stir in avocados. Serve immediately or cover the surface with plastic wrap and chill for up to 1 hour.

Tuesday, May 31, 2011

Bruschetta with Artichoke Hearts and Parmesan

I mean toast with artichoke and cheese spread. 


Here is a trick for making food that people seem to really enjoy. First, find a reliably good cookbook or cooking magazine, and then, do what it says. One such reliably good magazine is Cook's Illustrated. They do all the work of experimenting with and perfecting a recipe and the reader just follows directions. This recipe from the September/October 2010 edition seemed to be a hit on memorial day. 


Artichoke Hearts and Parmesan 
1 14-ounce can of artichoke hearts, rinsed and patted dry with paper towels
2 tsp. lemon juice
1 medium garlic clove, minced or pressed through garlic press
2 Tbsp. extra-virgin olive oil
2 Tbsp. finely shredded fresh basil (1 Tbsp. for garnish, if desired)
Table salt and ground black pepper
2 ounces Parmesan cheese, 1 ounce graded, one once shaved with a vegetable peeler 
1 recipe Toasted Bread for Bruschetta (see below)
Directions: Pulse artichoke hearts, lemon juice, garlic, olive oil, basil, 1/4 tsp. salt, and 1/4 tsp. pepper in food processor until coarse puree forms. Add grated Parmesan and pulse to combine. Divide artichoke mixture among toasts and spread to edges. Top with shaved Parmesan (I also added some shredded basil  on top of the Parmesan).


Toasted Bread for Bruschetta
Adjust oven rack so it is about 4 inches from heating element and heat broiler. Slice 1 loaf crusty country bread (about 10 by 5 inches, ends discarded) cross-wise into 3/4 inch thick pieces and place on foil-lined baking sheet. Broil until bread is deep golden, 1 to 2 minutes. Flip and repeat on second side. Lightly rub 1 side of slices with 1/2 medium peeled garlic clove and brush with extra-virgin olive oil. (You will need 1/4 cup oil; I used carmelized garlic oil instead of rubbing with garlic since I had it on hand.)


The burnt batch turned out to be more desirable than the "perfect" batch. I like it when people surprise me.


Monday, May 30, 2011

Indian dinner for my father's 60th birthday

My father recently turned 60 and all of his children collected in the midwest to throw him a birthday party. My oldest sister successfully prepped, cooked, and coordinated a Mexican feast for a group of 25, consisting of our family and some of our father's closest friends. I took on the less onerous task of cooking for the immediate family on our father's actual birthday. Because I have made at least two disastrous meals for my family in the past, the details of which I cringe to report here, I chose to stick with two Indian dishes that I have made before; Palak (Spinach) Panir and Gobhi Aloo Sabji (Curried Cauliflower and Potatoes). Everything I know about Indian cooking I have learned from my mother and Yamuni Devi's Lord Krishna's Cuisine: The Art of Indian Vegetarian Cooking. This is a great cookbook as it not only includes several hundred recipes, but it also provides descriptions of Indian ingredients and traditional cooking techniques. 


Palak panir includes copious amounts of spinach, spices, and fresh unripened Indian cheese, called panir. Devi describes panir as the equivalent of tofu for India's vegetarians. While making fresh cheese may sound like a daunting task, it is actually remarkably easy. The trick is to know what you are looking for. You will need whole milk, a curdling agent (e.g., lemon juice), a heat source, and supplies to drain the whey from the curds (e.g., colander and cheesecloth or new handkerchief). For this palak panir recipe you will need 11-12 oz. of panir. The recipe for this amount is as follows:


Panir
10 cups whole milk
5 1/2 Tbs. strained fresh lemon juice 
(note: depending on the the milk, you may need to use more or less curdling agent)
Directions:
1. Pour the milk into a heavy-bottomed pan with plenty of room for milk to rise. Heat on high and bring milk to a foaming boil, stirring often to prevent sticking or burning. Reduce the heat to low, and when boiling subsides, drizzle in the lemon juice. After 10 to 15 seconds, remove from heat, and slowly push mixing spoon back and forth through the milk until large lumps of curd separate from the yellow whey. This step should be obvious, if you are wondering whether the curds have separated, they probably haven't. Here is a picture:


Cover, and set aside for 10 minutes until the cheese has settled under the whey. 
2. Line colander with 4 layers of cheese cloth and place in the sink. Gently poor the whey and curds into colander, collecting the curds while the whey drains into the sink. The whey can also be collected and used as a curdling agent for tomorrow's fresh cheese or added instead of water to many recipes. 


3. Gather up the corners of the cheese cloth and twist 1-2 times. Hold cheese under running water for 5 to 10 seconds to wash away curdling agent. Continue to gently twist the cloth to help squeeze out excess whey. I've attached the following slightly vulgar photo to show how little cheese comes from 10 cups of whole milk. 


4. Now you want to allow the whey to continue to drain from the cheese. This can be done by hanging the cheesecloth from a hook to allow the curd to compact under its own weight. To speed up this process  you may also leave cheese in a colander with a weight on top. Drain for 2 1/2 to 3 1/2 hours. 


6. Unwrap the cheese and use as directed in recipe. 


Palak Panir
The recipe I used for the palak panir is one I adapted when out of town and making this dish for my sister. I didn't have my Indian cookbook with me, so I put together this recipe based on what I remembered from Devi's recipe and recipes I found online. This recipe creates a very rich and creamy palak panir. I don't fry the panir cubes before combining with the spinach, as called for in many recipes, so if you would like the cheese cubes to hold their shape in the spinach, fry them in hot oil and remove with slotted spoon and set aside before adding the panir to the spinach mixture. 
2 green chillies
1 small onion
1 inch piece of ginger
2 garlic cloves
3 Tbs. ghee (clarified butter) or nut oil
4 Tbs. water or panir whey
2 tsp. coriander powder
2 tsp. cumin
1/2 tsp. turmeric
1/2 tsp. gram masala
1 lb. spinach (in the future I will use 2 lbs. for this recipe)
3/4 cups sour cream
cubed panir
Directions: 
1. Combine chilies, onion, ginger, and garlic in food processor to make paste. If needed, add water to thin. 
2. Add paste to hot ghee on stove and cook until soft and fragrant. Add coriander powder, cumin, turmeric, and garam masala. Fry for 1 minute. 
3. Add spinach and cook until wilted. Fold in 3/4 cups sour cream and cubed panir. 


As I indicated in the ingredients, I will use two lbs. of spinach when making this dish in the future. I'd also like to experiment with methods of getting the panir cubes to hold their shape without frying them.


Gobhi Aloo Sabji (Curried Cauliflower and Potatoes)
From The Art of Vegetarian Indian Cooking (Pgs. 180-181)
2 hot green chillies, stemmed, seeded and cut lengthwise into long slivers
1/2 inch ginger, cut into thin julienne
1 tsp. cumin seeds
1/2 tsp. black mustard seeds
4 Tbs. ghee or mixture of vegetable oil and unsalted butter

1 medium-sized cauliflower (about 2 lbs.), trimmed, cored, and cut into florets (2 1/2 x 1/2 x 1/2 inches long)
2 medium-sized red or green tomatoes, quartered
1/2 tsp. turmeric
2 tsp. ground coriander
1/2 tsp. garam masala
1 tsp. brown sugar
1 1/4 tsp. salt
2 Tbs. fresh cilantro or parsley, chopped
Directions: 
1. Combine the chilies, ginger, cumin seeds, and mustard seeds in a small bowl. Heat the ghee in a large nonstick saucepan over moderately high heat. When hot, but not smoking, pour in the combined seasonings and fry until the mustard seeds turn gray, sputter, and pop. Add the potatoes and cauliflower and stir-fry for 4 to 5 minutes or until lightly browned.
2. Add the tomatoes, turmeric, coriander, garam masala, sugar, salt, and half of the fresh herb. Combine, cover and gently cook over low heat, stirring occasionally, for 15 to 20 minutes or until the vegetables are tender. You may want to add a few tablespoons of water if the vegetables begin sticking to the bottom of the pan, as you want to be able to stir gently and avoid mashing or breaking the vegetables. Serve with remaining fresh herb. 


Serve all dishes with basmati rice. For this meal I also ordered appetizers and naan (flatbread cooked in a tandoori clay oven) from a local Indian restaurant to supplement the meal.  


Here is a picture of the "tablescape."


Expanding my previous note on the most important ingredient being family and friends to share with, I would also like to add that serious eaters are incredibly rewarding to cook for. Lucky for me, several of my family members take the task of eating very seriously. 


Pops


 Lisa


 Chuck


Mom and Mike


Thursday, May 26, 2011

Coming Soon!

I received the following message from an anonymous reader who may or may not be one of my witty siblings: 


    Dear Molly, editor of Cardamom & Tea foodblog

    It has been 18 days since your last post, entitled "Sushi Party." As a devoted follower of 
    Cardamom & Tea foodblog, I must declare that the wait has been long enough. I cannot 
    speak for other C&T subscribers, but please deliver a fresh, new and exciting blog post 
    sometime soon. We know how busy you are with your other commitments, so thank you 
    in advance for your consideration in this matter.

    Thank you and have an amazing and delicious day.

    Best wishes and savory smiles,
    Anonymous 

I'm on it anonymous reader. Coming soon... Indian dinner for my father's 60th birthday. I appreciate your loyal readership and will try to be more timely in my future posts.